13 【代理配置 插槽】
13 【代理配置 插槽】
1.Vue脚手架配置代理
本案例需要下载axios库npm install axios
配置参考文档 Vue-Cli devServer.proxyvue.config.js 是一个可选的配置文件,如果项目的 (和 package.json 同级的) 根目录中存在这个文件,那么它会```被 @vue/cli-service自动加载。你也可以使用package.json 中的 vue `字段,但是注意这种写法需要你严格遵照 JSON 的格式来写
利用服务器之间访问不会有跨域,在中间开启一个服务器,端口号和项目端口号一样
1.1 方法一
在vue.config.js中添加如下配置:
devServer:{
  proxy:"http://localhost:5000"
}
说明:
- 优点:配置简单,请求资源时直接发给前端(8080)即可。
- 缺点:不能配置多个代理,不能灵活的控制请求是否走代理。
- 工作方式:若按照上述配置代理,当请求了前端不存在的资源时,那么该请求会转发给服务器 (优先匹配前端静态资源)
1.2 方法二
编写vue.config.js配置具体代理规则:
module.exports = {
	devServer: {
      proxy: {
      '/api1': {// 匹配所有以 '/api1'开头的请求路径
        target: 'http://localhost:5000',// 代理目标的基础路径
        changeOrigin: true,
        ws: true,                         //用于支持websocket,默认值为true
        pathRewrite: {'^/api1': ''} // 代理往后端服务器的请求去掉 /api1 前缀
      },
      '/api2': {// 匹配所有以 '/api2'开头的请求路径
        target: 'http://localhost:5001',// 代理目标的基础路径
        changeOrigin: true,
        pathRewrite: {'^/api2': ''}
      }
    }
  }
}
/*
   changeOrigin设置为true时,服务器收到的请求头中的host为:localhost:5000
   changeOrigin设置为false时,服务器收到的请求头中的host为:localhost:8080
   changeOrigin默认值为true
*/
说明:
- 优点:可以配置多个代理,且可以灵活的控制请求是否走代理。
- 缺点:配置略微繁琐,请求资源时必须加前缀。
src/App.vue
<template>
<div>
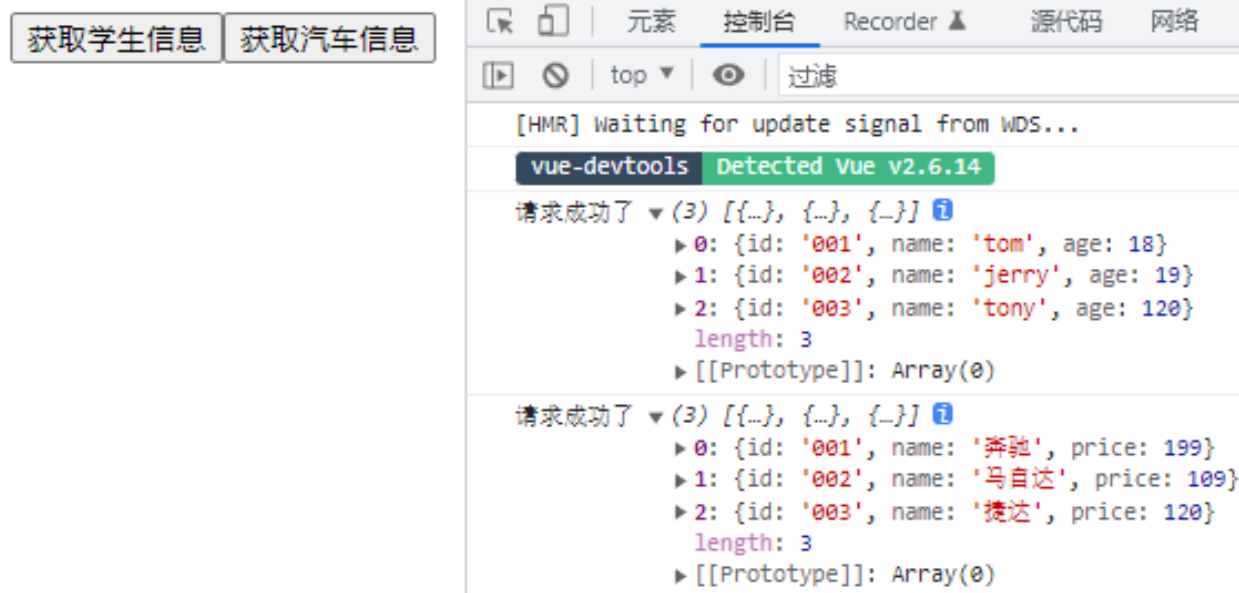
<button @click="getStudents">获取学生信息</button>
<button @click="getCars">获取汽车信息</button>
</div>
</template>
<script>
import axios from 'axios'
export default {
name:'App',
methods: {
getStudents() {
axios.get('http://localhost:8080/students').then(
response => {
console.log('请求成功了',response.data)
},
error => {
console.log('请求失败了',error.message)
}
)
},
getCars() {
axios.get('http://localhost:8080/demo/cars').then(
response => {
console.log('请求成功了',response.data)
},
error => {
console.log('请求失败了',error.message)
}
)
}
},
}
</script>
2.插槽(slot)
插槽是什么? 插槽就是子组件中的提供给父组件使用的一个占位符,用<slot></slot> 表示,父组件可以在这个占位符中填充任何模板代码,如 HTML、组件等,填充的内容会替换子组件的<slot></slot>标签。简单理解就是子组件中留下个“坑”,父组件可以使用指定内容来补“坑”。
- 作用:让父组件可以向子组件指定位置插入html结构,也是一种组件间通信的方式,适用于 父组件 ===> 子组件 。
- 分类:默认插槽、具名插槽、作用域插槽
2.1 后备(默认)内容
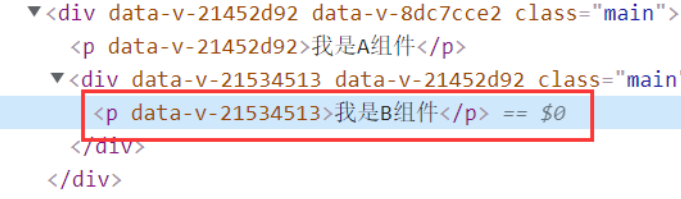
有时为一个插槽设置具体的后备 (也就是默认的) 内容是很有用的,它只会在没有提供内容的时候被渲染。
我们可能希望这个B组件内绝大多数情况下都渲染文本“我是B组件”。为了将“我是B组件”作为后备内容,我们可以将它放在 <slot> 标签内:
B.vue
<template>
  <div>
    <slot><p>我是B组件</p></slot>
  </div>
</template>
现在当我在一个父级组件中使用B组件并且不提供任何插槽内容时:
<B></B>
后备内容“我是B组件”将会被渲染:
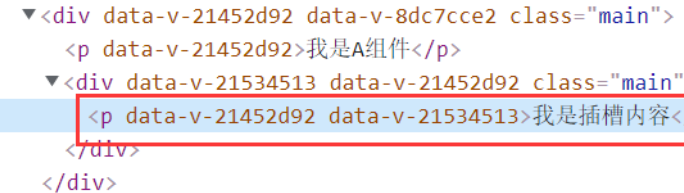
<B>
  <p>我是插槽内容</p>
</B>
则这个提供的内容将会被渲染从而取代后备内容:
2.2 默认插槽
父组件中:
        <Category>
           <div>html结构1</div>
        </Category>

子组件中:Category
        <template>
            <div>
               <!-- 定义插槽 -->
               <slot>插槽默认内容...</slot>
            </div>
        </template>
使用<slot></slot>的组件指定的位置留一个坑,如果在外部,使用其组件包裹某内容(可以是任何模板代码,也可以是HTML,还可以是组件),则该内容就会被分发到<slot></slot>处(一个有趣的说法就是把“坑”补上),渲染出来。当然,也可以不放任何内容,不影响组件渲染,就好比最开始的情况。
注意:如果B组件的 template 中没有包含一个
<slot>元素,即不使用插槽,则该组件起始标签和结束标签之间的任何内容都会被抛弃。
2.3 具名插槽
所谓具名插槽,顾名思义就是起了名字的插槽。有时我们需要多个插槽,例如当我们想使用某种通用模板:
对于这样的情况,<slot> 元素有一个特殊的 attribute:name。这个 attribute 可以用来定义额外的插槽:
//B.vue
<template>
  <div>
    <header>
      <slot name="header"></slot>
    </header>
    <main>
      <slot></slot>
    </main>
    <footer>
      <slot name="footer"></slot>
    </footer>
  </div>
</template>
一个不带 name 的 <slot> 出口会带有隐含的名字“default”。
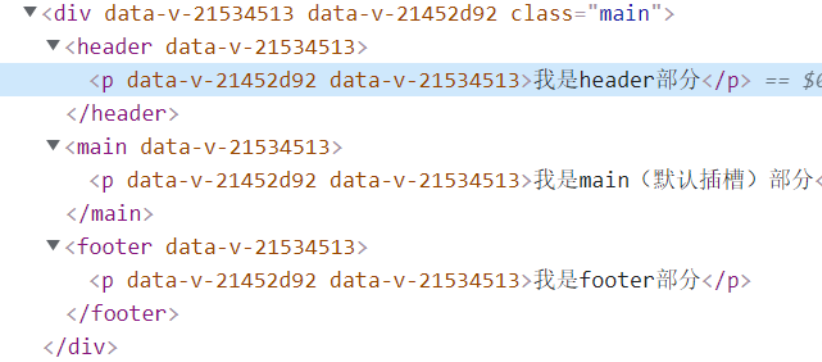
在向具名插槽提供内容的时候,我们可以在一个 <template> 元素上使用 slot 指令,并以 slot 的参数的形式提供其名称(当然也可以直接放在标签中,如<div slot="header">):
<template>
  <div>
    <p>我是A组件</p>
    <B>
      <template v-slot:header>//简写 <template #header>
        <p>我是header部分</p>
      </template>

      <p>我是main(默认插槽)部分</p>
 		//旧版写法
      <template slot="footer">
        <p>我是footer部分</p>
      </template>
    </B>
  </div>
</template>
页面效果如下:
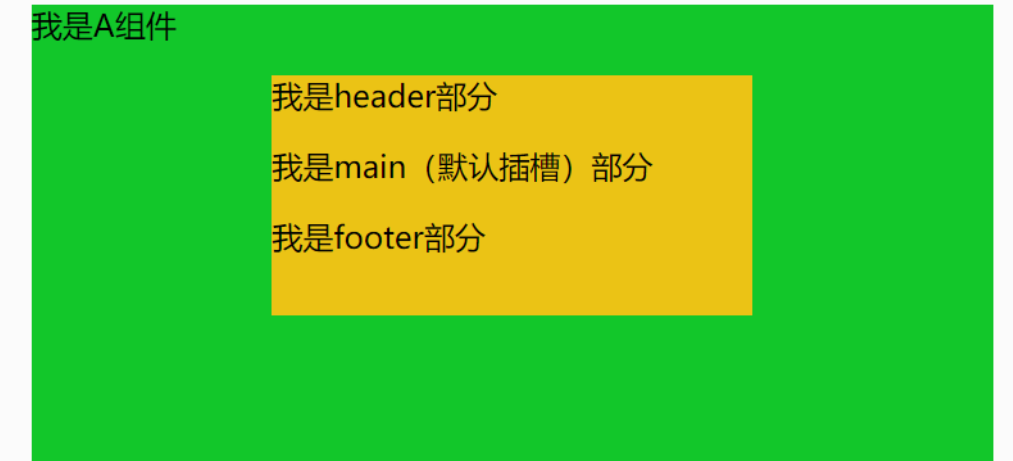
观察页面元素,内容被放入相应名字的插槽中:
Tips:说到这里就不得不提一下,这种方式在项目中比较常用,可以当成一个复用(通用)模板组件。如多个组件的布局使用相似模板,只是具体内容不同,那么我们可以使用这种插槽方式封装成一个通用组件,在其他组件使用的时候只需要传对应的内容到对应名字的插槽即可,不需要将该模板在每个组件重新写一遍,减少代码冗余,大大提高开发效率。
2.4 作用域插槽
scope用于父组件往子组件插槽放的html结构接收子组件的数据
理解:数据在组件的自身,但根据数据生成的结构需要组件的使用者来决定。(obj数据在B组件中,但使用数据所遍历出来的结构由A组件决定)
为了让 obj在父级的插槽内容中可用,我们可以将 obj作为 <slot> 元素的一个 attribute 绑定上去:
假设B组件:
<template>
  <div>
    <p>我是B组件</p>
    <slot :obj="obj">{{obj.firstName}}</slot>
  </div>
</template>

<script>
export default {
  name:'B',
  data(){
    return {
      obj:{
        firstName:'leo',
        lastName:'lion'
      }
    }
  }
}
</script>
绑定在 <slot> 元素上的 attribute 被称为插槽 prop。现在在父级作用域中,我们可以使用带值的 slot-scope 来定义我们提供的插槽 prop 的名字
我们可能想换掉备用内容,用“lion”来显示。如下,在A组件:
<template>
  <div class="main">
    <p>我是A组件</p>
	//旧版
    <B>
      <template slot-scope="data">
        <h4>{{data.obj.lastName}}</h4>
      </template>
    </B>

	<B>
     //<template v-slot:default="data"> 也可以这样写,下面是简写  v-slot 和 v-shot:default 是一样的效果。但当遇到缩写形式时需要显示调用。
      <template v-slot="data">
        {{data.obj.lastName}}
      </template>
    </B>
  </div>
</template>
注意:关于样式,既可以写在父组件中,解析后放入子组件插槽;也可以放在子组件中,传给子组件再解析
如果你有使用过ElementUI里面的表格el-table,当改变某一列展示的字段时,我们经常使用:
<el-table-column>
  <template slot-scope="scope">
    <span>{{scope.row.xxx}}</span>
  </template>
</el-table-column>
2.5 具名结合作用域
子组件CategoryThree.vue
<template>
  <div class="category">
    <h3>{{ title }}</h3>
    <slot :test="test">我是默认的一些内容</slot>
    <slot :games="games" name="footer">footer</slot>
  </div>
</template>

<script>
export default {
  props: ['title'],
  data() {
    return {
      test: 'default',
      games: ['红色警戒', '穿越火线', '劲舞团', '超级玛丽'],
    };
  },
};
</script>
父组件App.vue
<template>
<div class="container">
    <CategoryThree title="游戏">
      <template v-slot:default="games">
        <ul>
          <li v-for="(g, index) in games.games" :key="index">{{ g }}</li>
        </ul>
      </template>
    </CategoryThree>

    <CategoryThree title="游戏">
      <template v-slot="{ test }">
        {{ test }}
      </template>
      <template v-slot:footer="{ games }">
        <h4 v-for="(g, index) in games" :key="index">{{ g }}</h4>
      </template>
    </CategoryThree>
  </div>
</template>

<script>
import CategoryThree from './components/CategoryThree.vue';
export default {
  name: 'App',
  components: {
    CategoryThree
  }
};
</script>
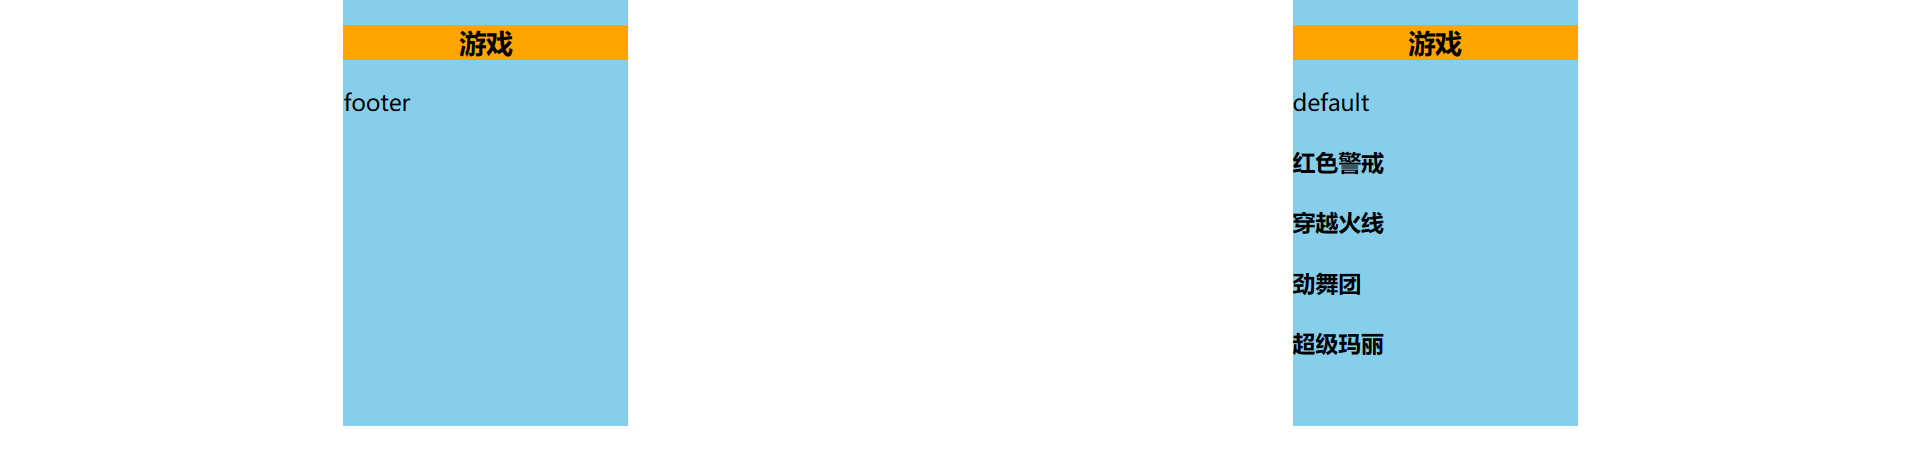
如果与具命插槽同用,则要写插槽的名字,如果没有写名字,默认从没有名字的插槽获取数据


