21 【styled-components的使用】
21 【styled-components的使用】
1.为什么要用这个
我们都知道,我们从最开始学css的时候,为了避免写的样式影响到另外的地方。所以我们这样来写的。
#userConten .userBtn button{
  font-size: 18px;
}
首先给一个元素写了一个唯一id | class,然后在这个里面写对应的样式,就可以避免影响到其它地方的代码。但是,如果项目是多人协作,那就可能存在命名冲突了,所以我们想要一种技术来让整个项目起的类名都是唯一的id。避免样式冲突等问题。所以css in js 就来了。
简单来说CSS-in-JS就是将应用的CSS样式写在JavaScript文件里面,而不是独立为一些.css,.scss或者less之类的文件,这样你就可以在CSS中使用一些属于JS的诸如模块声明,变量定义,函数调用和条件判断等语言特性来提供灵活的可扩展的样式定义
使用这个技术写的库有很多,react中火的是styled-components,vue中css scope也是这个思想,每个组件都有它的scopeId,样式进行绑定,css modules也是同样的。react中css in js为什么火,框架本身就是html css js 写在一个组件混着写,虽然有些违背一些主流说法,但这就是它的特点,毕竟本身就就可以说html in js,再来一个css in js也很正常。
实现这个的库有很多,在react中最火的就是styled-components。
2.简介
styled-components 是作者对于如何增强 React 组件中 CSS 表现这个问题的思考结果 通过聚焦于单个用例,设法优化了开发者的体验和面向终端用户的输出.
Styled Components 的官方网站将其优点归结为:
- Automatic critical CSS:
styled-components持续跟踪页面上渲染的组件,并自动注入样式。结合使用代码拆分, 可以实现仅加载所需的最少代码。 - 解决了 class name 冲突:
styled-components为样式生成唯一的 class name,开发者不必再担心 class name 重复、覆盖以及拼写的问题。(CSS Modules通过哈希编码局部类名实现这一点) - CSS 更容易移除:使用
styled-components可以很轻松地知道代码中某个 class 在哪儿用到,因为每个样式都有其关联的组件。如果检测到某个组件未使用并且被删除,则其所有的样式也都被删除。 - 简单的动态样式:可以很简单直观的实现根据组件的
props或者全局主题适配样式,无需手动管理多个 classes。(这一点很赞) - 无痛维护:无需搜索不同的文件来查找影响组件的样式,无论代码多庞大,维护起来都是小菜一碟。
- 自动提供前缀:按照当前标准写 CSS,其余的交给
styled-components处理。
因为 styled-components 做的只是在 runtime 把 CSS 附加到对应的 HTML 元素或者组件上,它完美地支持所有 CSS。 媒体查询、伪选择器,甚至嵌套都可以工作。但是要注意,styled-components 是 React 下的 CSS-in-JS 的实践,因此下面的所有例子的技术栈都是 React。
3.安装
安装样式化组件只需要一个命令
npm install --save styled-components
yarn add styled-components
如果使用像 yarn 这样支持 “resolution” package.json 字段的包管理器,还要添加一个与主要版本范围对应的条目。这有助于避免因项目中安装的多个版本的样式化组件而引起的一整类问题。
在package.json:
{
  "resolutions": {
    "styled-components": "^5"
  }
}
注意
强烈推荐使用 styled-components 的 babel 插件 (当然这不是必须的).它提供了许多益处,比如更清晰的类名,SSR 兼容性,更小的包等等.
.babelrc{ "plugins": [ "babel-plugin-styled-components" ] }
如果没有使用模块管理工具或者包管理工具,也可以使用官方托管在 unpkg CDN 上的构建版本.只需在HTML文件底部添加以下<script>标签:
<script src="https://unpkg.com/styled-components/dist/styled-components.min.js"></script>
添加 styled-components 之后就可以访问全局的 window.styled 变量.
const Component = window.styled.div`
  color: red;
`
注意
这用使用方式需要页面在 styled-components script 之前引入 react CDN bundles
VsCode 有一款插件 vscode-styled-components 能识别 styled-components ,并能自动进行 CSS 高亮、补全、纠正等。

4.基本使用
样式化组件利用标记的模板文本来设置组件的样式。
它删除了组件和样式之间的映射。这意味着当你定义你的样式时,你实际上是在创建一个普通的 React 组件,它附加了你的样式。
以下的例子创建了两个简单的附加了样式的组件, 一个Wrapper和一个Title:
import styled from 'styled-components'

/*
创建一个Title组件,
将render一个带有样式的h1标签
*/
const Title = styled.h1`
  font-size: 1.5em;
  text-align: center;
  color: palevioletred;
`;

/*
创建一个Wrapper组件,
将render一个带有样式的section标签
*/
const Wrapper = styled.section`
  padding: 4em;
  background: papayawhip;
`;

// 使用 Title and Wrapper 得到下面效果图
render(
  <Wrapper>
    <Title>
      Hello World!
    </Title>
  </Wrapper>
);
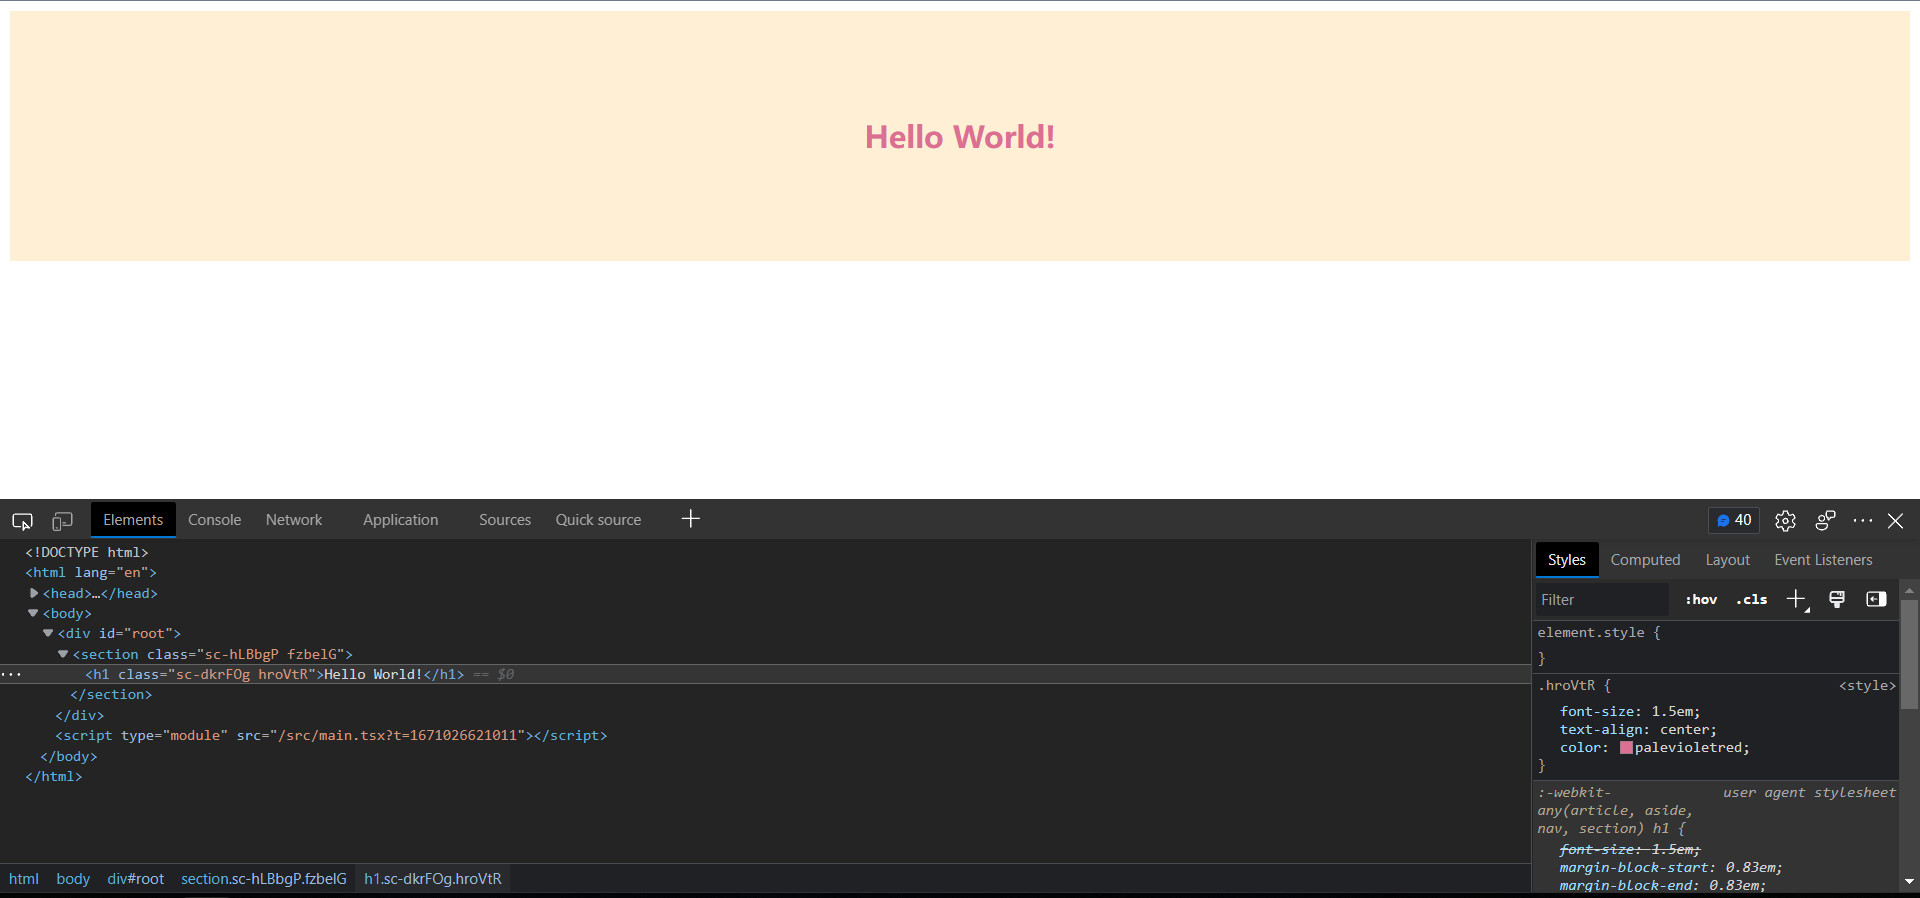
值得注意的是styled-components创建的组件首字母必须以大写开头。
几乎所有基础的HTML标签styled都支持,比如div,h1,span…
styled.xxx后面的.xxx代表的是最终解析后的标签,如果是styled.a那么解析出来就是a标签,styled.div解析出来就是div标签。
注意
styled-components 会为我们自动创建 CSS 前缀
5.基于props动态实现
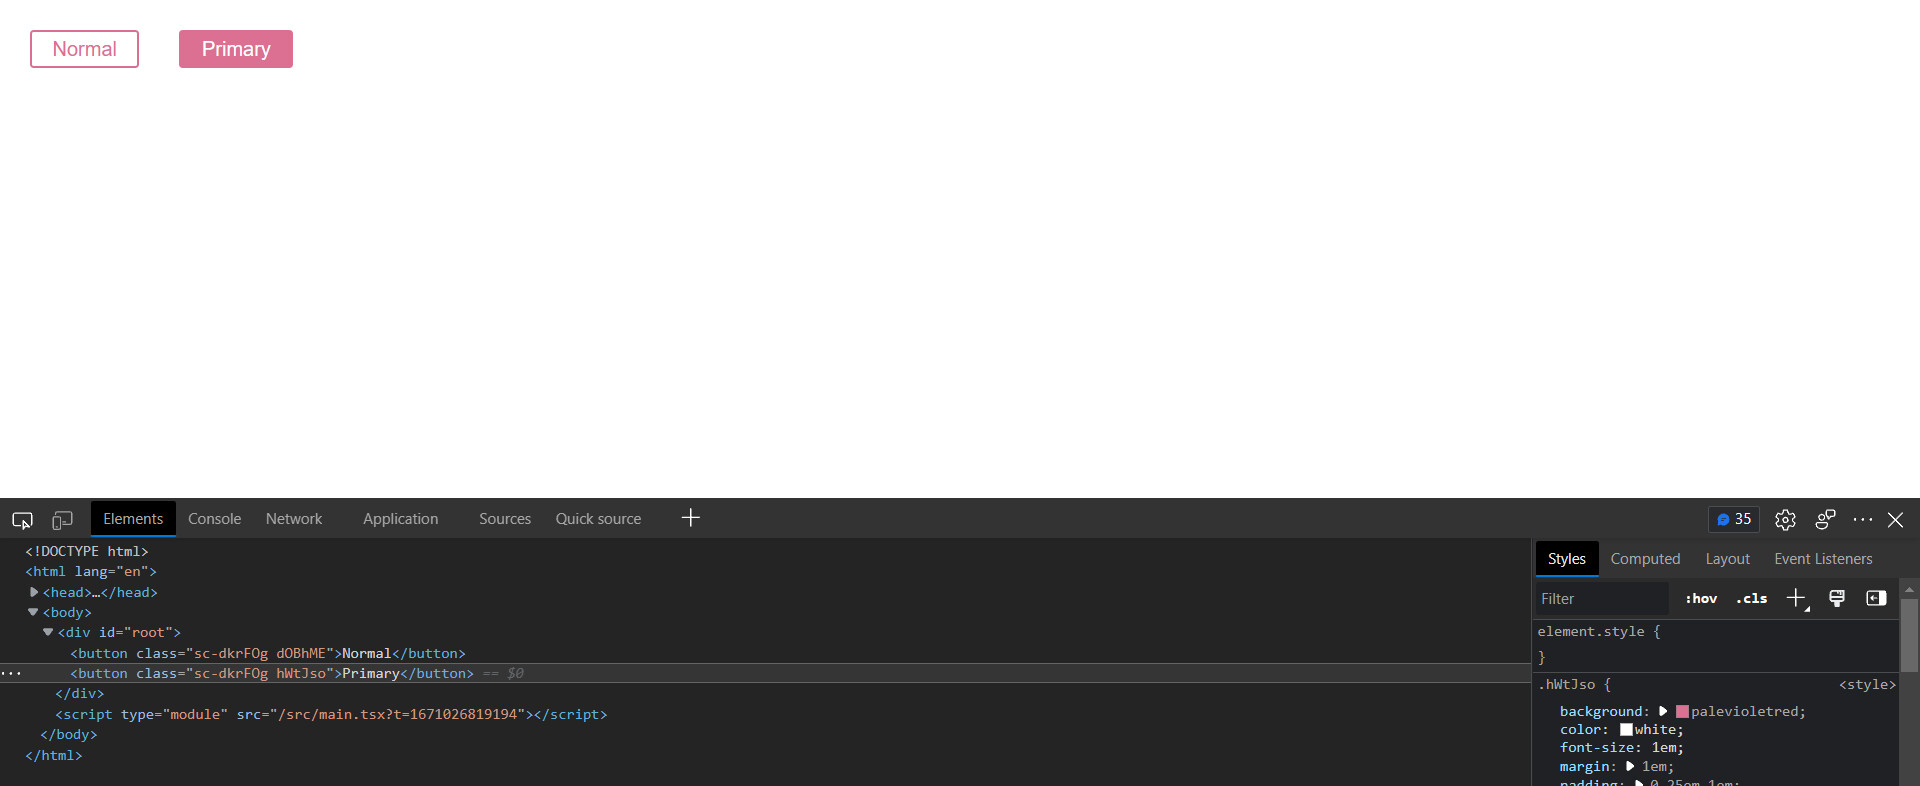
我们可以将 props 以插值的方式传递给styled component,以调整组件样式.
下面这个 Button 组件持有一个可以改变color的primary属性. 将其设置为 ture 时,组件的background-color和color会交换.
const Button = styled.button`
  background: ${props => props.primary ? "palevioletred" : "white"};
  color: ${props => props.primary ? "white" : "palevioletred"};
  font-size: 1em;
  margin: 1em;
  padding: 0.25em 1em;
  border: 2px solid palevioletred;
  border-radius: 3px;
`;

render(
  <>
    <Button>Normal</Button>
    <Button primary>Primary</Button>
  </>
);
对于react开发者来说,这个还是比较香的。有人说用了这个之后,检查元素无法定位元素,其实它本身name是可以展示的,dev开发时候有一个插件配一下即可styled-components: Tooling
6.样式继承
可能我们希望某个经常使用的组件,在特定场景下可以稍微更改其样式.当然我们可以通过 props 传递插值的方式来实现,但是对于某个只需要重载一次的样式来说这样做的成本还是有点高.
创建一个继承其它组件样式的新组件,最简单的方式就是用构造函数styled()包裹被继承的组件.下面的示例就是通过继承上一节创建的按钮从而实现一些颜色相关样式的扩展:
// 上一节创建的没有插值的 Button 组件
const Button = styled.button`
  color: palevioletred;
  font-size: 1em;
  margin: 1em;
  padding: 0.25em 1em;
  border: 2px solid palevioletred;
  border-radius: 3px;
`;

// 一个继承 Button 的新组件, 重载了一部分样式
const TomatoButton = styled(Button)`
  color: tomato;
  border-color: tomato;
`;

render(
  <div>
    <Button>Normal Button</Button>
    <TomatoButton>Tomato Button</TomatoButton>
  </div>
);
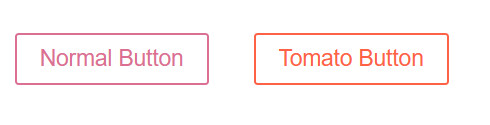
可以看到,新的TomatoButton仍然和Button类似,我们只是添加了两条规则.
在某些情况下,您可能需要更改样式化组件渲染的标签或组件。这在构建导航栏时很常见,例如导航栏中同时存在链接和按钮,但是它们的样式应该相同.
在这种情况下,我们也有替代办法(escape hatch). 我们可以使用多态 "as" polymorphic prop 动态的在不改变样式的情况下改变元素:
const Button = styled.button`
  display: inline-block;
  color: palevioletred;
  font-size: 1em;
  margin: 1em;
  padding: 0.25em 1em;
  border: 2px solid palevioletred;
  border-radius: 3px;
`;

const TomatoButton = styled(Button)`
  color: tomato;
  border-color: tomato;
`;

render(
  <div>
    <Button>Normal Button</Button>
    <Button as="a" href="/">Link with Button styles</Button>
    <TomatoButton as="a" href="/">Link with Tomato Button styles</TomatoButton>
  </div>
);
这也完美适用于自定义组件:
const Button = styled.button`
  display: inline-block;
  color: palevioletred;
  font-size: 1em;
  margin: 1em;
  padding: 0.25em 1em;
  border: 2px solid palevioletred;
  border-radius: 3px;
`;

const ReversedButton = props => <button {...props} children={props.children.split('').reverse()} />

render(
  <div>
    <Button>Normal Button</Button>
    <Button as={ReversedButton}>Custom Button with Normal Button styles</Button>
  </div>
);
比如:
styled("div"),styled.tagname的方式就是 styled(tagname)`的别名.
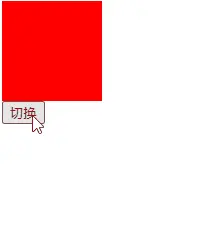
7.条件渲染
styled-components最核心的一点,我个人认为也是这一点,让styled-components变得如此火热,我们直接先看下代码:
字符串前面那个css可加可不加,不加也是能够正常进行渲染的,但是还是推荐加,如果你不加的话在编辑器中就会失去提示的功能,编辑器会把它当作字符串而不是CSS样式。
import { useState } from "react";
import styled, { css } from "styled-components";

const Box = styled.div`
  ${(props) =>
    props?.small
      ? css`
          width: 100px;
          height: 100px;
        `
      : css`
          width: 200px;
          height: 200px;
        `}

  background-color: red;
`;

export default function App() {
  const [small, setSmall] = useState(true);

  return (
    <div>
      <Box small={small} />
      <button onClick={() => setSmall(!small)}>切换</button>
    </div>
  );
}
可以看到,使用styled-components编写组件样式的过程会变得异常的简单,如果你用的是CSS,那么你是无法通过React的Props进行更改CSS中的属性,你只能通过Props动态更改dom上绑定的类名,就如同下面的代码一样。
import { useState } from "react";
import "./styles.css";

export default function App() {
  const [small, setSmall] = useState(true);

  return (
    <div>
      <div className={small ? "box-small" : "box"} />
      <button onClick={() => setSmall(!small)}>切换</button>
    </div>
  );
}
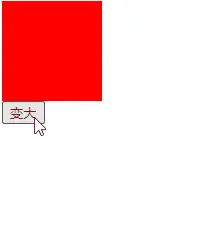
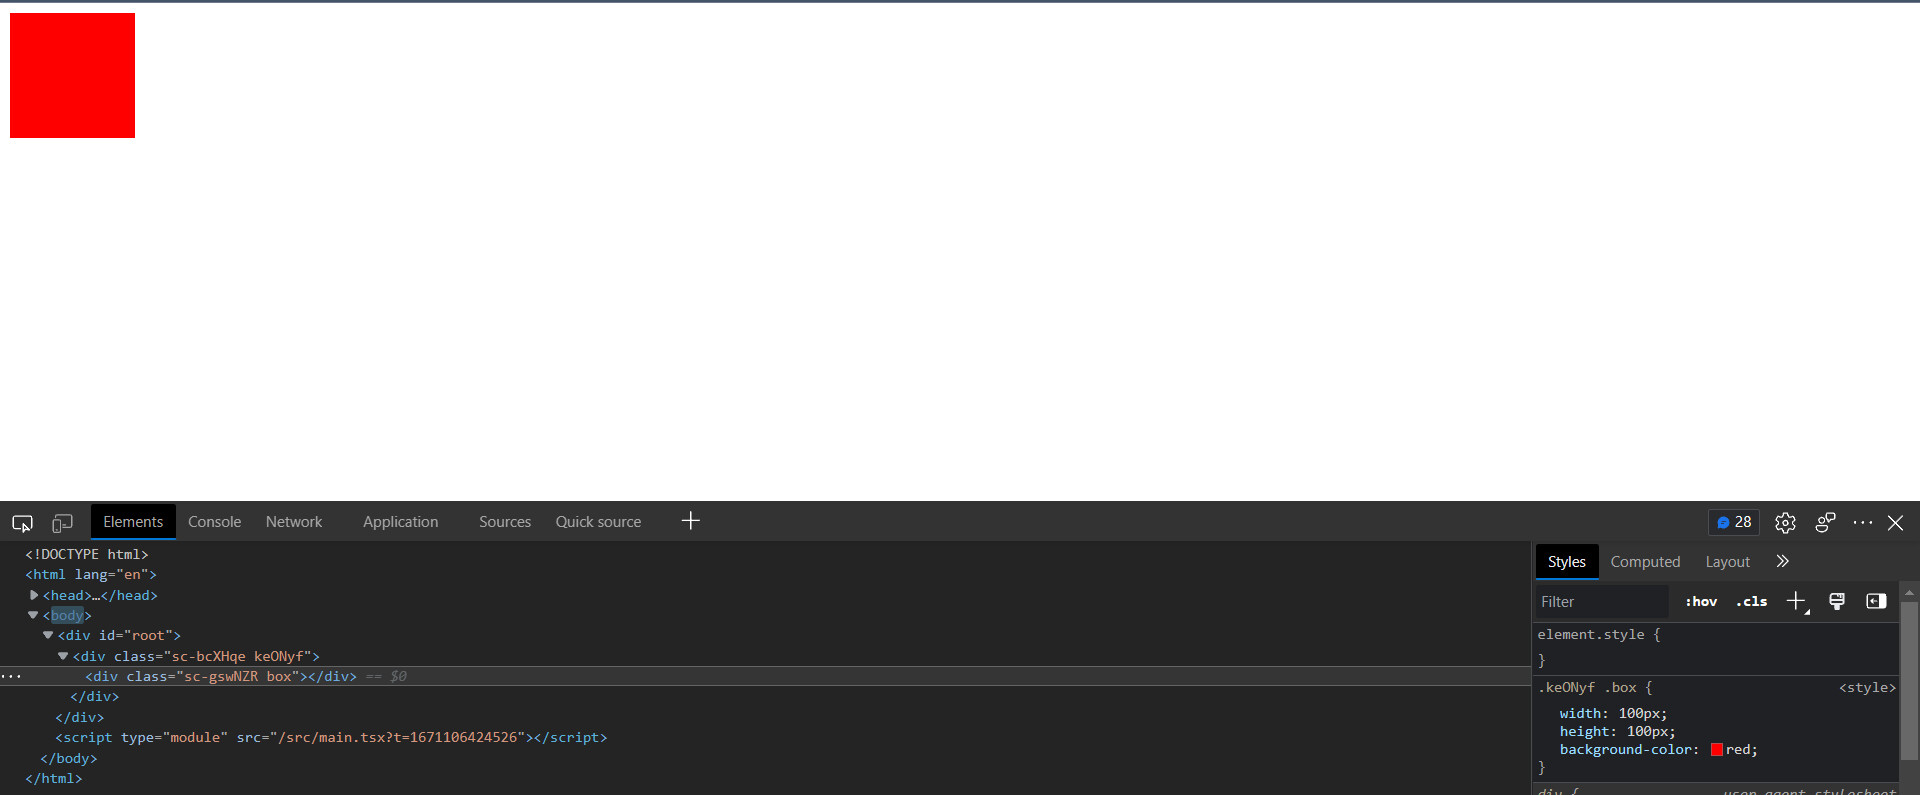
这样看起来styled-components没有什么特别的,甚至上面的写法还比较麻烦?其实styled-components的威力不止于此,我们看一下下面的例子:
import { useState } from "react";
import styled, { css } from "styled-components";

const Box = styled.div`
  ${(props) => css`
    width: ${props?.size}px;
    height: ${props?.size}px;
  `}
  background-color: red;
`;

export default function App() {
  const [size, setSize] = useState(100);

  return (
    <div>
      <Box size={size} />
      <button onClick={() => setSize(size + 2)}>变大</button>
    </div>
  );
}
渲染如下:
如果是通过CSS属性就非常难以实现这种效果,只有靠React官方提供的style-in-js方案,直接编写行内属性:
import { useState } from "react";

export default function App() {
  const [size, setSize] = useState(100);

  return (
    <div>
      <div style={{ width: size, height: size, backgroundColor: "red" }} />
      <button onClick={() => setSize(size + 2)}>变大</button>
    </div>
  );
}
8.普通样式
如果使用过Vue的同学应该很清楚,在.vue文件中有个style标签,你只需要加上了scoped就可以进行样式隔离,而styled-components其实完全具有Vue的style标签的能力,你只需要在最外面包一层,然后就可以实现Vue中样式隔离的效果。
import styled from 'styled-components'

const AppStyle = styled.div`
	.box {
		width: 100px;
		height: 100px;
		background-color: red;
	}
`
const Div = styled.div``

export default function App() {
	return (
		<AppStyle>
			<Div className="box"></Div>
		</AppStyle>
	)
}
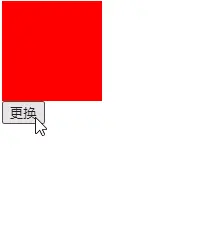
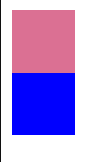
甚至还可以配合上面的条件渲染进行使用,也非常的方便:
import { useState } from "react";
import styled, { css } from "styled-components";

const AppStyle = styled.div`
  ${({ change }) =>
    change
      ? css`
          .box {
            width: 200px;
            height: 200px;
            background-color: blue;
          }
        `
      : css`
          .box {
            width: 100px;
            height: 100px;
            background-color: red;
          }
        `}
`;

export default function App() {
  const [change, setChange] = useState(false);

  return (
    <AppStyle change={change}>
      <div className="box" />
      <button
        onClick={() => {
          setChange(true);
        }}
      >
        更换
      </button>
    </AppStyle>
  );
}
渲染效果如下图所示:
9.attrs
为了避免仅为传递一些props来渲染组件或元素而使用不必要的wrapper, 可以使用 .attrs constructor. 通过它可以添加额外的 props 或 attributes 到组件.
在一些HTML标签中是有一些属性的,比如input标签中,有type这个属性,我们就可以使用attrs给上一个默认值,还可以实现不传对应的属性则给一个默认值,如果传入对应的属性则使用传入的那个属性值。
import styled from "styled-components";

const Input = styled.input.attrs((props) => ({
  // 直接指定一个值
  type: "text",

  // 给定一个默认值,可以传入Props进行修改
  size: props.size || "1em"
}))`
  color: palevioletred;
  font-size: 1em;
  border: 2px solid palevioletred;
  border-radius: 3px;

  margin: ${(props) => props.size};
  padding: ${(props) => props.size};
`;

export default function App() {
  return (
    <div>
      <Input placeholder="A small text input" />
      <br />
      <Input placeholder="A bigger text input" size="2em" />
    </div>
  );
}
渲染效果:

有继承的话,以继承后的组件中的属性为准
const Input = styled.input.attrs((props) => ({
  type: "text",
  size: props.size || "1em"
}))`
  border: 2px solid palevioletred;
  margin: ${(props) => props.size};
  padding: ${(props) => props.size};
`;

// 有继承的话,以继承后的组件中的属性为准
const PasswordInput = styled(Input).attrs({
  type: "password"
})`
  border: 2px solid aqua;
`;

export default function App() {
  return (
    <div>
      <Input placeholder="A bigger text input" size="2em" />
      <br />
      <PasswordInput placeholder="A bigger password input" size="2em" />
    </div>
  );
}
最后渲染结果:

10.动画
虽然使用@keyframes的 CSS 动画不限于单个组件,但我们仍希望它们不是全局的(以避免冲突). 这就是为什么 styled-components 导出 keyframes helper 的原因: 它将生成一个可以在 APP 应用的唯一实例。
动画需要使用keyframes进行声明,如下所示:
import styled, { keyframes } from "styled-components";
// 通过keyframes创建动画
const rotate = keyframes`
from {
transform: rotate(0deg);
}
to {
transform: rotate(360deg);
}
`;
// 创建动画的组件
const Rotate = styled.span`
display: inline-block;
animation: ${rotate} 2s linear infinite;
padding: 2rem 1rem;
font-size: 1.2rem;
`;
export default function App() {
return (
<div>
<Rotate>< ></Rotate>
</div>
);
}
渲染结果:
11.Coming from CSS
11.1 styled-components 如何在组件中工作?
styled-components 如何在组件中工作?
如果你熟悉在组件中导入 CSS(例如 CSSModules),那么下面的写法你一定不陌生:
import React from 'react'
import styles from './styles.css'

export default class Counter extends React.Component {
  state = { count: 0 }

  increment = () => this.setState({ count: this.state.count + 1 })
  decrement = () => this.setState({ count: this.state.count - 1 })

  render() {
    return (
      <div className={styles.counter}>
        <p className={styles.paragraph}>{this.state.count}</p>
        <button className={styles.button} onClick={this.increment}>
          +
        </button>
        <button className={styles.button} onClick={this.decrement}>
          -
        </button>
      </div>
    )
  }
}
由于 Styled Component 是 HTML 元素和作用在元素上的样式规则的组合, 我们可以这样编写Counter:
import React from 'react'
import styled from 'styled-components'

const StyledCounter = styled.div`
  /* ... */
`
const Paragraph = styled.p`
  /* ... */
`
const Button = styled.button`
  /* ... */
`

export default class Counter extends React.Component {
  state = { count: 0 }

  increment = () => this.setState({ count: this.state.count + 1 })
  decrement = () => this.setState({ count: this.state.count - 1 })

  render() {
    return (
      <StyledCounter>
        <Paragraph>{this.state.count}</Paragraph>
        <Button onClick={this.increment}>+</Button>
        <Button onClick={this.decrement}>-</Button>
      </StyledCounter>
    )
  }
}
注意,我们在StyledCounter添加了"Styled"前缀,这样组件Counter 和StyledCounter 不会明明冲突,而且可以在 React Developer Tools 和 Web Inspector 中轻松识别.
11.2 使用伪元素、选择器、嵌套语法
由于 styled-components 采用 stylis 作为预处理器,因此提供了对伪元素、伪选择器以及嵌套写法的支持(跟 Les 很类似)。其中,& 指向组件本身:
const Thing = styled.div`
  color: blue;
`
伪元素和伪类无需进一步细化,而是自动附加到了组件:
const Thing = styled.button`
  color: blue;

  ::before {
    content: '🚀';
  }

  :hover {
    color: red;
  }
`

render(
  <Thing>Hello world!</Thing>
)
对于更复杂的选择器,可以使用与号(&)来指向主组件.以下是一些示例:
const ScDiv = styled.div`
   color: blue;

  &:hover {
    color: red; // 被 hover 时的样式
  }

  & ~ & {
    background: tomato; // ScDiv 作为 ScDiv 的 sibling
  }

  & + & {
    background: lime; // 与 ScDiv 相邻的 ScDiv
  }

  &.something {
    background: orange; // 带有 class .something 的 ScDiv
  }

  .something-child & {
    border: 1px solid; // 不带有 & 时指向子元素,因此这里表示在带有 class .something-child 之内的 ScDiv
`;

render(
  <React.Fragment>
    <ScDiv>Hello world!</ScDiv>
    <ScDiv>How ya doing?</ScDiv>
    <ScDiv className="something">The sun is shining...</ScDiv>
    <ScDiv>Pretty nice day today.</ScDiv>
    <ScDiv>Don't you think?</ScDiv>
    <div className="something-else">
      <ScDiv>Splendid.</ScDiv>
    </div>
  </React.Fragment>
)
复制代码
渲染的结果如图所示:

如果只写选择器而不带&,则指向组件的子节点.
const Thing = styled.div`
  color: blue;

  .something {
    border: 1px solid; // an element labeled ".something" inside <Thing>
    display: block;
  }
`

render(
  <Thing>
    <label htmlFor="foo-button" className="something">Mystery button</label>
    <button id="foo-button">What do I do?</button>
  </Thing>
)
最后,&可以用于增加组件的差异性;在处理混用 styled-components 和纯 CSS 导致的样式冲突时这将会非常有用:
const Thing = styled.div`
  && {
    color: blue;
  }
`

const GlobalStyle = createGlobalStyle`
  div${Thing} {
    color: red;
  }
`

render(
  <React.Fragment>
    <GlobalStyle />
    <Thing>
      I'm blue, da ba dee da ba daa
    </Thing>
  </React.Fragment>
)
12.媒体查询
开发响应式 web app 时媒体查询是不可或缺的工具.
以下是一个非常简单的示例,展示了当屏宽小于700px时,组件如何改变背景色:
const Content = styled.div`
  background: papayawhip;
  height: 3em;
  width: 3em;

  @media (max-width: 700px) {
    background: palevioletred;
  }
`;

render(
  <Content />
);
由于媒体查询很长,并且常常在应用中重复出现,因此有必要为其创建模板.
由于 JavaScript 的函数式特性,我们可以轻松的定义自己的标记模板字符串用于包装媒体查询中的样式.我们重写一下上个例子来试试:
const sizes = {
  desktop: 992,
  tablet: 768,
  phone: 576,
}

// Iterate through the sizes and create a media template
const media = Object.keys(sizes).reduce((acc, label) => {
  acc[label] = (...args) => css`
    @media (max-width: ${sizes[label] / 16}em) {
      ${css(...args)}
    }
  `

  return acc
}, {})

const Content = styled.div`
  height: 3em;
  width: 3em;
  background: papayawhip;

  /* Now we have our methods on media and can use them instead of raw queries */
  ${media.desktop`background: dodgerblue;`}
  ${media.tablet`background: mediumseagreen;`}
  ${media.phone`background: palevioletred;`}
`;

render(
  <Content />
);
13.as prop
as - 转变组件类型,比如将一个div转变为button
const Component = styled.div`
  color: red;
`;

render(
  <Component
    as="button"
    onClick={() => alert('It works!')}
  >
    Hello World!
  </Component>
)
export default () => {
  return (
    // as(可以是组件名,也可以是普通标签名): 表示要渲染出来的标签或组件
    // 这个例子表示: 继承了 ScExtendedButton 样式的 a 标签
    <ScExtendedButton as="a" href="#">
      Extends Link with Button styles
    </ScExtendedButton>
  )
}
14.样式化任意组件
14.1 样式化组件
const Link = ({ className, children }) => (
  // className 属性附加到 DOM 元素上
  <a className={className}>
    {children}
  </a>
)

const StyledLink = styled(Link)`
  color: red;
  font-weight: bold;
`

render(
  <div>
    <Link>Unstyled Link</Link>
    <StyledLink>Styled Link</StyledLink>
  </div>
)
14.2 样式化第三方组件
import { Button } from 'antd'

const ScButton = styled(Button)`
  margin-top: 12px;
  color: green;
`

render(
  <div>
    <ScButton>Styled Fusion Button</ScButton>
  </div>
)
15.主题切换
15.1 基本使用
styled-components 通过导出 <ThemeProvider> 组件从而能支持主题切换。 <ThemeProvider>是基于 React 的 Context API 实现的,可以为其下面的所有 React 组件提供一个主题。在渲染树中,任何层次的所有样式组件都可以访问提供的主题。例如:
import styled, {ThemeProvider} from "styled-components";

// 通过使用 props.theme 可以访问到 ThemeProvider 传递下来的对象
const Button = styled.button`
  font-size: 1em;
  margin: 1em;
  padding: 0.25em 1em;
  border-radius: 3px;
  color: ${props => props.theme.main};
  border: 2px solid ${props => props.theme.main};
`;

// 为 Button 指定默认的主题
Button.defaultProps = {
  theme: {
    main: "palevioletred"
  }
}

const theme = {
  main: "mediumseagreen"
};

render(
  <div>
    <Button>Normal</Button>
    // 采用了 ThemeProvider 提供的主题的 Button
    <ThemeProvider theme={theme}>
      <Button>Themed</Button>
    </ThemeProvider>
  </div>
);

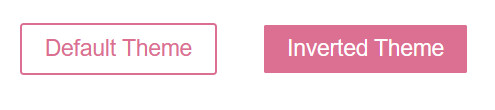
15.2 函数主题
ThemeProvider 的 theme除了可以接受对象之外,还可以接受函数。函数的参数是父级的 theme对象。此外,还可以通过使用 theme prop 来处理 ThemeProvider 未定义的情况(这跟上面的 defaultProps是一样的效果),或覆盖 ThemeProvider的 theme。例如:
const ScButton = styled.button`
  color: ${props => props.theme.fg};
  border: 2px solid ${props => props.theme.fg};
  background: ${props => props.theme.bg};
`;

const theme = {
  fg: "palevioletred",
  bg: "white"
};

const invertTheme = ({ fg, bg }) => ({
  fg: bg,
  bg: fg
});

render(
  // ThemeProvider 未定义的情况
  <ScButton theme={{
    	fg: 'red',
      bg: 'white'
    }}>Default Theme</ScButton>
  <ThemeProvider theme={theme}>
    <div>
      <ScButton>Default Theme</ScButton>
    	// theme 接收的是一个函数,函数的参数是父级的 theme
      <ThemeProvider theme={invertTheme}>
        <ScButton>Inverted Theme</ScButton>
      </ThemeProvider>
      // 覆盖 ThemeProvider的 theme
      <ScButton theme={{
        fg: 'red',
      	bg: 'white'
        }}>Override Theme</ScButton>
    </div>
  </ThemeProvider>
);
15.3 在 styled-components 外使用主题
如果需要在styled-components外使用主题,可以使用高阶组件withTheme:
import { withTheme } from 'styled-components'

class MyComponent extends React.Component {
  render() {
    console.log('Current theme: ', this.props.theme)
    // ...
  }
}

export default withTheme(MyComponent)
通过useContext React hook
使用React Hooks时,还可以使用useContext访问样式化组件之外的当前主题。
import { useContext } from 'react'
import { ThemeContext } from 'styled-components'

const MyComponent = () => {
  const themeContext = useContext(ThemeContext)

  console.log('Current theme: ', themeContext)
  // ...
}
通过useTheme自定义挂钩
使用React Hooks时,您还可以使用useTheme访问样式组件之外的当前主题。
import { useTheme } from 'styled-components'

const MyComponent = () => {
  const theme = useTheme()

  console.log('Current theme: ', theme)
  // ...
}
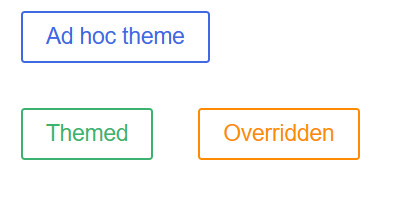
15.4 theme prop
主题可以通过theme prop传递给组件.通过使用theme prop可以绕过或重写ThemeProvider所提供的主题.
// Define our button
const Button = styled.button`
  font-size: 1em;
  margin: 1em;
  padding: 0.25em 1em;
  border-radius: 3px;

  /* Color the border and text with theme.main */
  color: ${props => props.theme.main};
  border: 2px solid ${props => props.theme.main};
`;

// Define what main theme will look like
const theme = {
  main: "mediumseagreen"
};

render(
  <div>
    <Button theme={{ main: "royalblue" }}>Ad hoc theme</Button>
    <ThemeProvider theme={theme}>
      <div>
        <Button>Themed</Button>
        <Button theme={{ main: "darkorange" }}>Overridden</Button>
      </div>
    </ThemeProvider>
  </div>
);
16.Refs
通过传递ref prop给 styled component 将获得:
- 底层 DOM 节点 (如果 styled 的对象是基本元素如 div)
- React 组件实例 (如果 styled 的对象是 React Component)
const Input = styled.input`
  padding: 0.5em;
  margin: 0.5em;
  color: palevioletred;
  background: papayawhip;
  border: none;
  border-radius: 3px;
`;

class Form extends React.Component {
  constructor(props) {
    super(props);
    this.inputRef = React.createRef();
  }

  render() {
    return (
      <Input
        ref={this.inputRef}
        placeholder="Hover to focus!"
        onMouseEnter={() => {
          this.inputRef.current.focus()
        }}
      />
    );
  }
}

render(
  <Form />
);

注意
v3 或更低的版本请使用 innerRef prop instead.
17.样式对象
styled-components 支持将 CSS 写成 JavaScript 对象.对于已存在的样式对象,可以很轻松的将其迁移到 styled-components.
// Static object
const Box = styled.div({
  background: 'palevioletred',
  height: '50px',
  width: '50px'
});

// Adapting based on props
const PropsBox = styled.div(props => ({
  background: props.background,
  height: '50px',
  width: '50px'
}));

render(
  <div>
    <Box />
    <PropsBox background="blue" />
  </div>
);
18.CSS Prop实现内联样式
避免创建新的组件,直接应用样式,需要用到 styled-components 提供的 babel-plugin: styled-components.com/docs/toolin…
<div
  css={`
    background: papayawhip;
    color: ${props => props.theme.colors.text};
  `}
/>

<MyComponent css="padding: 0.5em 1em;"/>
参考:https://styled-components.com/docs/tooling#babel-plugin
19.mixin
import styled, { css } from 'styled-components';
import { Button as FusionButton } from 'antd';

const mixinCommonCSS = css`
  margin-top: 12px;
  border: 1px solid grey;
  borde-radius: 4px;
`;

const ScButton = styled.button`
  ${mixinCommonCSS}
  color: yellow;
`;

const ScFusionButton = styled(FusionButton)`
  ${mixinCommonCSS}
  color: blue;
`;
20.性能问题
Styled-Components 定义的组件一定要放在组件函数定义之外(对于 Class 类型的组件,不要放在 render 方法内 )。因为在 react 组件的 render 方法中声明样式化的组件,会导致每次渲染都会创建一个新组建。 这意味着 React 将不得不在每个后续渲染中丢弃并重新计算 DOM 子树的那部分,而不是仅仅计算它们之间变化的差异,从而导致性能瓶颈和不可预测的行为。
// ❌ 绝对不要这样写
const Header = () => {
  const Title = styled.h1`
    font-size: 10px;
  `

  return (
    <div>
      <Title />
    </div>
  )
}

// ✅应该要这样写
const Title = styled.h1`
  font-size: 10px;
`

const Header = () => {
  return (
    <div>
      <Title />
    </div>
  )
}
此外,如果 styled-components 的目标是一个简单的 HTML 元素(例如 styled.div),那么 styled-components 将传递所有原生的 HTML Attributes 给 DOM。如果是自定义 React 组件(例如 styled(MyComponent)),则 styled-components 会传递所有的 props。
21.配合TypeScript
React+TypeScript一直是神组合,React可以完美的搭配TypeScript。
但在TypeScript中使用得先安装@types/styled-components类型声明库:
npm install @types/styled-components -D
如在是要在TypeScript中,那么需要对styled-components组件的属性类型进行声明,不然会报错,虽然不会影响最终的编译结果:
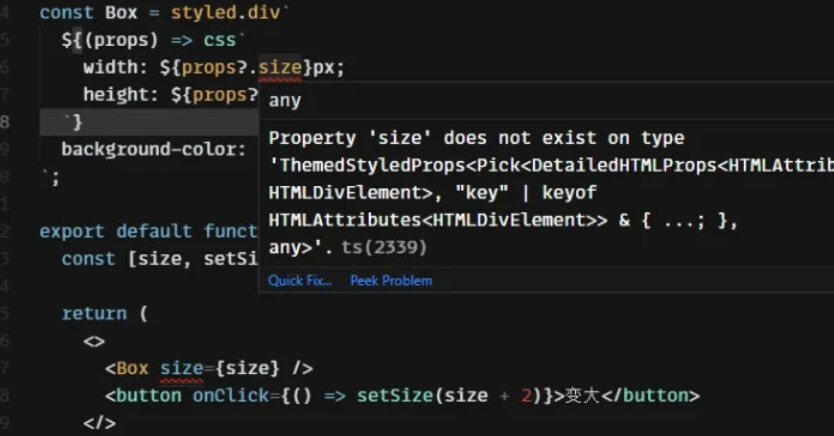
下面的组件类型就需要进行声明:

下面例子展示了一个样式化的 Button 接收 primary 属性,并根据该属性调整背景颜色 background 以及 color。
import React, {
  ButtonHTMLAttributes
} from 'react';
import styled from 'styled-components';

interface IScButtonProps extends ButtonHTMLAttributes<HTMLButtonElement> {
    primary?: boolean;
}

const ScWrapper = styled.div`
    margin-top: 12px;
`;

const ScButton = styled.button<IScButtonProps> `
    background: ${props => props.primary ? "blue" : "white"};
    color: ${props => props.primary ? "white" : "blue"};
    border: 2px solid palevioletred;
    border-radius: 3px;
    padding: 0.25em 1em;
`;

export default () => {
  return (
   <ScWrapper>
       <ScButton>Normal</ScButton>
       <ScButton primary>Primary</ScButton>
  </ScWrapper>
  );
};


